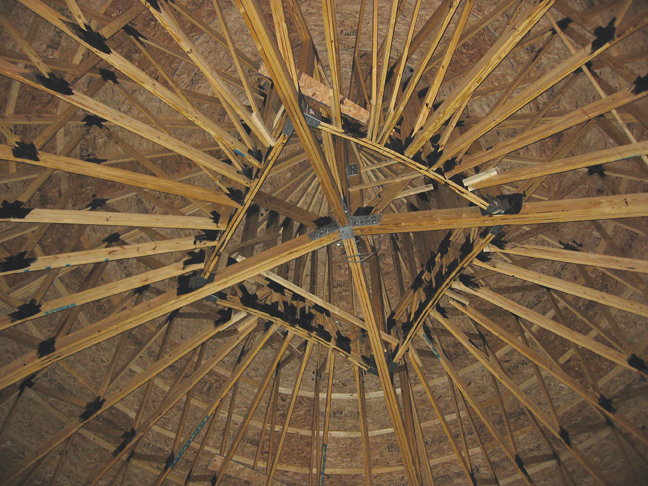
Wood truss construction surged in popularity in the 1960s and ’70s, but back then most buildings that used metal-plate-connected wood trusses had flat ceilings. With today’s CAD and BIM technology, however, manufacturers can create trusses for much more intricate and complicated architectural designs.
Archie Landreman, a technical director with WoodWorks, an initiative of the Wood Products Council, offers eight tips for working with metal-plate-connected wood trusses.
1. Sweat the details.
Creating a complete set of construction documents is the first no-brainer step for any wood truss project. “The more information the team has, the better job they’re going to do,” Landreman says. “You need a complete set of blueprints—architectural, structural, mechanical.”
Detailed sections, including design loads, spacing, building codes, and special shapes, are crucial for a manufacturer to properly design trusses for your project. Providing these details up front will save time and money, and the approval process will go more smoothly.
Landreman’s advice: Make sure the truss heel height isn’t overlooked during the blueprint stage. “A lot of times, plans are drawn in such a way that that particular section of the building is generic—it doesn’t necessarily show details to scale,” he says. To accurately calculate heel height, the manufacturer needs detailed information—including a drawing of a typical wall section—on wall height, height at the bottom of the header, length of the overhang, and dimensions for the soffit and fascia materials.
2. Specifications are as important as blueprints.
To design trusses properly, you must supply the manufacturer with a specification book. Such documentation may include specific carpentry information on trusses that does not appear on the project blueprints. Without a spec book, the truss manufacturer could do a complete set of truss layouts and profiles for approval, Landreman says, only to have the architect or structural engineer come back with a whole new set of drawings and specifications. “It could add a lot of time and expense for the manufacturer to have to redo something that was done without complete information,” Landreman says.
Landreman’s advice: Provide the truss manufacturer with the spec book at the time of the bid. “In some cases, it can provide a lot more detail than the blueprint itself.”
3. Get close to your manufacturer.
Before beginning a truss project, do your research on several truss manufacturers. Don’t be afraid to ask tough questions; for example, “Have you done big commercial jobs with spans in excess of 60 feet before?”
Ask truss manufacturers for their annual business volume, which can be an indicator of experience. “If someone’s manufacturing $10 million worth of trusses a year, you would think that they should have more experience and probably be able to do a better job than a manufacturer that’s doing $500,000 a year,” he says. Business volume may not always be a perfect indicator, but it’s a factor you should take into consideration.
Landreman’s advice: Ask manufacturers for references on projects similar to yours to get a sense of their experience in that area. “Not everybody has done the kind of job you’re working on,” he says.
4. Keep in touch with your manufacturer as the job progresses.
Developing a solid relationship with your truss manufacturer is important, since a good manufacturer can assist your Building Team during the early stages of the design process. If, for example, you’re designing a building with a 26-foot span for a floor truss, get the specifications details to the manufacturer, request a preliminary drawing, and work with the manufacturer’s drawing to develop a better sense of what the truss would look like and whether the manufacturer’s concept can become a reality.
Landreman’s advice: Work with the truss manufacturer to get details on span and truss height before starting any drawings to make sure the basic design concept will work before it is put on paper.
5. Make your manufacturer part of your Building Team.
When your manufacturer completes shop drawings for the placement diagrams of the trusses, getting input from all parties involved in the project should provide added perspective before final approval of these documents.
Landreman’s advice: Share manufacturer drawings with all the members of your Building Team, so that “you’re getting viewpoints from different angles.”
6. Schedule the wood truss work carefully.
The approval process can take time. To keep on schedule, leave ample time for placing the order, completing the layout and profile designs, and approving the drawings. According to Landreman, this process usually takes about two weeks, but it can vary depending on the manufacturer, the time of year, and the size and complexity of the project.
Landreman’s advice: Ask the manufacturer how long to expect the drawings to take once the purchase order or contract is placed.
7. Follow the manufacturer’s directions carefully.
The truss manufacturer should provide detailed guidelines on truss storage and installation during the approval process and upon delivery to the job site. The guidelines should include instructions on storage, lifting installation, bracing, cutting, and notching. Follow the manufacturer’s guidelines to the letter, since problems can occur if trusses are mishandled.
The chief problem is damage during delivery to the job site, as trusses are being rolled off the truck and dropped to the ground. “If they put them on a really rough part of the job site, some of the trusses could be broken or there could be damage to the connector plates when they hit the ground,” Landreman says.
Some trusses cannot be repaired once they’re put in place, so damage that goes unnoticed until after the trusses and roof sheeting are installed could result in extra time and expense to remove the sheeting and put in a new truss.
To avoid any confusion during installation, the manufacturer’s instructions should include the latest set of truss drawings showing the proper placement of all of the trusses. “Many times through the approval process some of the details in the drawings may change,” Landreman says. “If the contractor in the field doesn’t have the last revised set of truss drawings, some of those numbers and placements might have changed, and the truss could wind up in the wrong location.”
Landreman’s advice: If any instructions, warnings, or recommendations are missing, call the manufacturer immediately. “They are more than willing to get that information to you or send someone out to the site to help make sure everything’s going the way it’s supposed to.”
8. Treat floor trusses with special care.
Floor trusses can be trickier than roof trusses. “With roof trusses, there’s a tremendous amount of design flexibility, and usually you’re dealing with slope trusses,” Landreman says. With floor trusses, however, “the height of the floor truss can affect the design of the whole building, especially when you’re looking to accommodate mechanicals in those floor trusses,” he says.
For example, say you’re designing a three-story building using 24-foot floor trusses, and you expect the truss to be 12 inches deep. During the bidding process, however, the manufacturer determines that each truss needs to be 16 inches deep. “That would add a whole foot to the building height, and it’s probably not going to work,” says Landreman.
Landreman’s advice: Consult your manufacturer on truss depth and spacing when considering floor trusses for any large-scale project, rather than relying on a preprinted span table.
Related Stories
| Jan 9, 2012
METALCON International 2012 announced
METALCON 2012 is scheduled for Oct. 9-11 at the Donald E Stephens Convention Center, Hall A, Rosemont, Ill.
| Jan 9, 2012
Lutron appoints Pessina president
In his 35-year career with Lutron, Pessina has acquired broad experience in the engineering, quality assurance and manufacturing areas.
| Jan 9, 2012
A new journey for KSS Architects co-founder
Kehrt's legacy of projects include Rutgers University's Biomedical Engineering Building, the renovation and expansion of Cornell University School of Hotel Administration, the recent new campus center at The Richard Stockton College of New Jersey and Princeton Township's Municipal Complex.
| Jan 8, 2012
TCA releases The Construction of Tilt-Up
The newest publication from the TCA is the second in a planned trilogy of resources covering the architecture, engineering and construction of Tilt-Up
| Jan 8, 2012
WHR Architects promotes Joel Colwell, AIA, to principal
With over 30 years of experience, Colwell has managed large-scale, complex projects for major healthcare systems as well as challenging smaller renovations and additions — all with notable success.
| Jan 6, 2012
Doug Wignall named president of HDR Architecture
HDR Architecture, Inc. is known for its award-winning designs for urban environments, campuses and buildings in the healthcare, science and technology, civic, justice and higher education markets.
| Jan 6, 2012
Gensler unveils restoration and expansion of Houston's Julia Ideson building
The "new" building will serve as a repository of Houston memorabilia and rare archival material as well as the city's official reception space and a venue for exhibits, meetings and other special events.
| Jan 6, 2012
New Walgreen's represents an architectural departure
The structure's exterior is a major departure from the corporate image of a traditional Walgreens design.
| Jan 6, 2012
Summit Design+Build completes Park Place in Illinois
Summit was responsible for the complete gut and renovation of the former auto repair shop which required the partial demolition of the existing building, while maintaining the integrity of the original 100 year-old structure, and significant re-grading and landscaping of the site.


